Create Your First Mod
Introduction
This tutorial aims to help you get started with mod development in LeviLamina. It is by no means a complete tutorial covering all possibilities in LeviLamina, but rather a general overview of the basics. First, make sure you understand C++, then set up your workspace in an IDE, and finally learn the fundamentals of most LeviLamina mods.
In this tutorial, we will create a simple mod with the following features:
- Players can use the
/suicidecommand to commit suicide - Players receive a clock when they enter the world for the first time
- When players use the clock, a confirmation dialog will appear asking whether they want to commit suicide. If confirmed, the player will die
This tutorial covers the following topics:
- Logging output
- Subscribing to events
- Registering commands
- Reading configuration files
- Database access
- Using forms
- Constructing Minecraft objects
- Calling Minecraft functions
Info
The complete source code for this tutorial can be found at ShrBox/ExampleMod. We recommend reading the source code alongside this tutorial.
Learning C++
These tutorials require basic knowledge of the C++ programming language. If you are just starting with C++ or need a refresher, here is a non-exhaustive list of resources.
- C++ Developer Roadmap
- cppreference.com
- C++ Tutorial
- C++ Language Tutorial
- hacking C++
- C++ Core Guidelines
Setting Up Your Workspace
Before developing mods (or learning C++), you need to set up a development environment. This includes, but is not limited to, the following:
- xmake
- Visual Studio Code
- Git
- Visual Studio (When installing Visual Studio, make sure to select "Desktop development with C++")
- LLVM: Open Visual Studio Installer, select "C++ Clang tools for Windows" under the optional components of "Desktop development with C++". Alternatively, download it from GitHub.
Installing Extensions for Visual Studio Code
After installing VSCode, you also need to install the following extensions:
Creating a Mod Repository
Visit levilamina-mod-template and click Use this template to initialize your mod repository using this template.
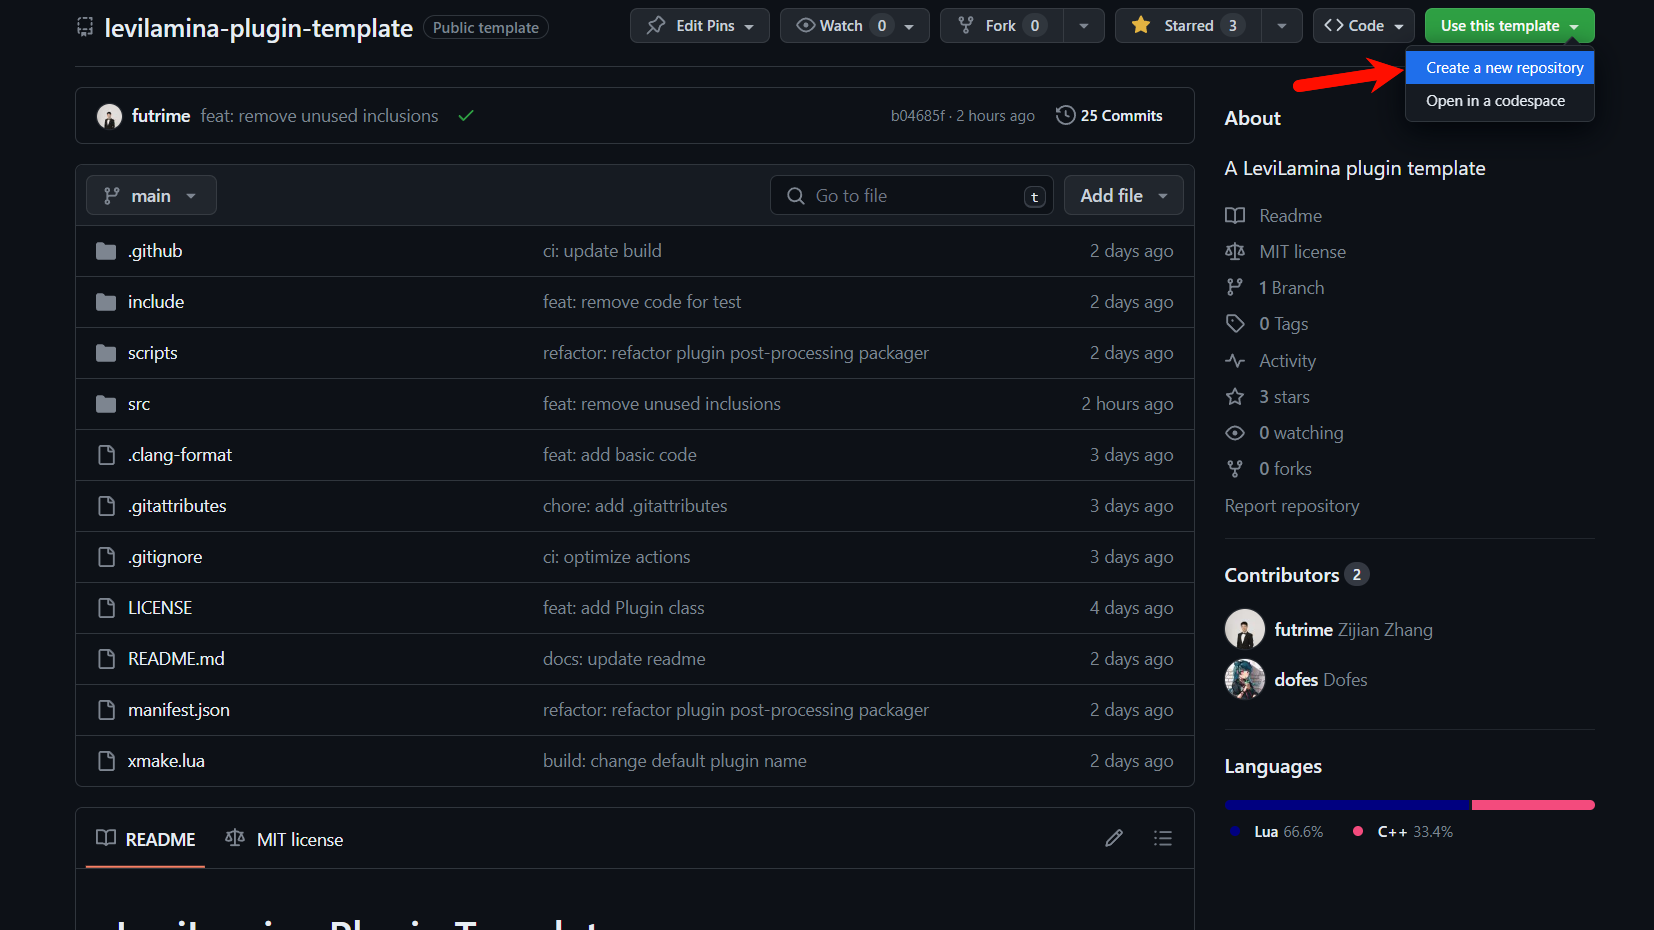
Clone the mod repository locally using git clone inside a folder used for storing mod projects, then open it with VSCode. You need to modify some files to fill in your mod information.
First, modify the mod name in xmake.lua. Changing the mod name specifies the name of your mod, which will be displayed in LeviLamina. The name may contain uppercase and lowercase English letters, numbers, and hyphens, but spaces and other special characters are not allowed. It is recommended to use formats such as example-mod or ExampleMod. In this tutorial, our mod is named ExampleMod.
| Lua | |
|---|---|
1 | |
Next, it is recommended to manually pin the LeviLamina version used by your mod. For example, if we want to use the latest version of LeviLamina 26.20, we add 26.20.* after levilamina as the version requirement. You can also specify a specific commit as the version, which is useful when adapting your mod to a new LeviLamina version before an official release is available.
| Lua | |
|---|---|
1 2 3 | |
Next, modify the contents of tooth.json. tooth.json provides information required by lip to install mod packages. After proper configuration, your mod will be included in Bedrinth and LeviLauncher, allowing users worldwide to download and install it.
Tip
In tooth.json, a variant with an empty label represents the server version, while a variant with label set to client represents the client version. If your mod is only available on the server or client, you can remove the unnecessary variant. In lip, you can install them using the following commands:
| Bash | |
|---|---|
1 2 3 4 5 | |
- Change the value of the
toothfield to your mod's GitHub repository URL, and fill in the information fields ininfo.info.avatar_urlwill be displayed on the mod pages of Bedrinth and LeviLauncher. Choosing a suitable icon is also an important part of presenting your mod. For convenience, this tutorial directly uses the author's GitHub avatar. - Change the LeviLamina target version in the
dependenciessection of eachvariantto the actual LeviLamina version used by your mod. - Fill in the
asset_urlfield according to the repository release URL, update the required LeviLamina version, and modify thesrcanddestfields inplaceaccording to the mod name specified inxmake.lua. For this tutorial's mod, the following is a possible example:
| JSON | |
|---|---|
1 2 3 4 5 6 7 8 9 10 11 12 13 14 15 16 17 18 19 20 21 22 23 24 25 26 27 28 29 30 31 32 33 34 35 36 37 38 39 40 41 42 43 44 45 46 47 48 49 50 51 52 53 54 55 56 57 58 59 60 61 62 63 64 65 66 67 68 69 70 71 72 73 74 75 76 77 78 79 80 81 82 83 84 85 | |
Then, you need to modify the copyright information in the LICENSE file. You can choose a suitable open-source license for your mod from here.
Your mod does not need to be open source. Since the mod template uses the CC0 license, you are free to modify or remove the LICENSE file. However, we recommend using an open-source license, as it makes it easier for others to use your mod and help improve it.
Next, modify the contents of the README.md file. This file will be displayed on your mod repository homepage. You can introduce your mod's features, usage instructions, configuration files, commands, and more here.
Finally, you need to modify the namespace name. Change the namespace my_mod and the class MyMod in MyMod.cpp and MyMod.h to the names you want.
Following common C++ conventions, namespace names should use lowercase letters and underscores, and should remain consistent. In this tutorial, we rename the namespace to example_mod and the class to ExampleMod.
Similarly, you can rename MyMod.cpp and MyMod.h to whatever you want, but remember to change #include MyMod.h in the source files to the new header file name.
Building Your Mod
Before we begin anything else, let's try building the empty mod first.
Find the XMake icon in the left sidebar of VSCode, then select the build mode. Here we choose Debug.
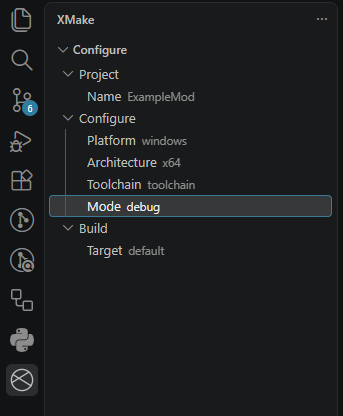
Then we need to manually specify whether the mod should be built as a server mod or a client mod.
- Click the Extensions button in the left sidebar of VSCode. In the Extensions tab, find XMake, then right-click and select Settings.
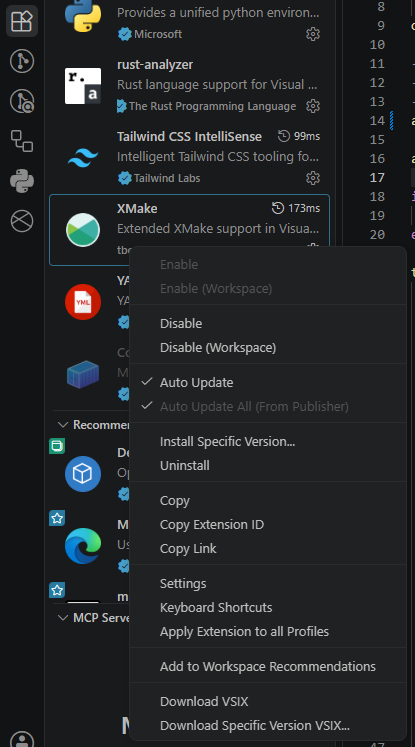
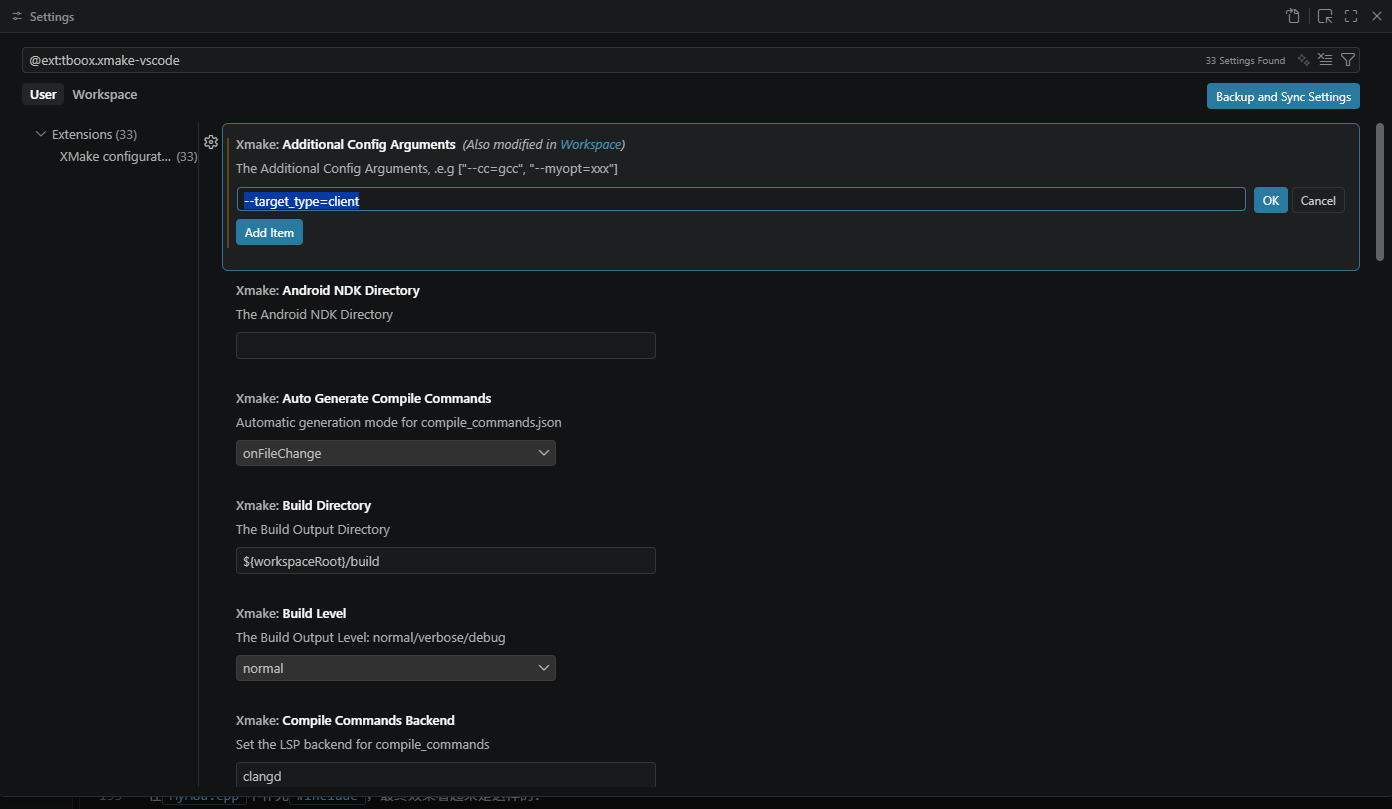
- In the settings page that appears, find
Additional Config Arguments, click Add Item below it, and enter--target_type=clientor--target_type=server.
These options represent building a client mod or server mod respectively.
Failure
If you encounter download failures while updating the repository or configuring the build process, you may need to configure the GitHub mirror proxy or configure an HTTP proxy:
Then click the Build the given target icon in the VSCode bottom bar to build the mod.
Registering the /suicide Command
In Minecraft, commands cannot be registered immediately when the game starts. They can only be registered after certain parts of the program have executed.
Therefore, you cannot register commands while the mod is loading. On the server side, you can register commands when the mod is enabled because the server has fully started at that point.
However, this cannot be done on the client side, because since version 26.10, the client enables mods when the game startup process completes, rather than when a local world finishes loading.
Therefore, in this tutorial, we will register the command by listening to the ServerCommandRegisterEvent.
Warning
When a mod is loaded, its loading method will be called. However, please do not perform any game-related operations such as event subscriptions or command registration inside the loading method, because these operations can only be performed after the game has finished loading.
If you perform these operations in the loading method, your mod will very likely crash during loading.
Tip
Generally speaking, the constructor of a mod should only perform initialization operations unrelated to the game, such as initializing the logging system, configuration files, databases, and so on.
- Include the required header files.
As mentioned above, we need to register commands inServerCommandRegisterEvent, so we need to include the following headers:
| C++ | |
|---|---|
1 2 3 4 | |
- Implement event listening and command registration in
ExampleMod::enable().
| C++ | |
|---|---|
1 2 3 4 5 6 7 8 9 10 11 12 13 14 15 16 17 18 19 20 21 22 23 24 25 26 27 28 29 30 31 32 33 34 35 36 37 38 39 40 41 42 43 44 45 46 47 48 49 50 51 52 53 54 55 56 57 58 59 60 61 62 63 64 65 66 67 68 69 70 71 72 73 74 75 76 77 78 79 | |
Let's break down the code above using the comments inside it.
LeviLamina's command system supports directly registering or obtaining commands using the CommandRegistrar::getOrCreateCommand() function.
| C++ | |
|---|---|
1 2 | |
The third parameter is the minimum permission level required to execute the command.
If we want ordinary players to be able to execute it, we should choose Any.
GameDirectors corresponds to players with at least Operator permissions (permissions granted through the console OP command or by promoting the player to operator through the pause menu).
Host corresponds to the permission level of the console.
Then, we need to add an overload to the command and set its corresponding callback.
| C++ | |
|---|---|
1 2 3 | |
Note
A command overload represents one possible pattern of a command.
For example, ll <unload|reload|reactivate> <mod:string> is one overload, while ll list is another overload.
Here is an example from LeviLamina's mod management commands:
| C++ | |
|---|---|
1 2 3 4 5 6 7 8 9 10 11 12 13 14 15 16 17 18 19 20 21 22 23 24 25 26 27 28 29 30 31 32 33 34 35 36 37 38 39 40 41 42 | |
Warning
Because MCBE lacks RTTI information, you cannot use dynamic_cast<T>().
Tip
You may have noticed another function, player->getName(), but we did not use it.
This is because a player's name can be modified through mods or other methods, while the result of player->getRealName() is fixed.
At this point, the command object has been fully configured.
When the server starts, or when the client enters a local world, the command object will be loaded into the game.
If the enable() function returns false, LeviLamina will consider the mod enabling process failed and display an error message in the console.
Reading Configuration Files
The second feature of our mod is giving players a clock when they first join the server.
The third feature is displaying a suicide confirmation prompt when the player uses the clock, allowing the player to commit suicide after confirmation.
However, there is a problem with these two features: the server administrator may already have installed other mods that provide similar functionality and may not want to use these features from this suicide mod.
Therefore, we want to provide a way for administrators to enable or disable these two features.
We are pleased to announce that LeviLamina implements reflection for configuration files and configuration structures in C++.
This means we can define a structure in C++, then define an instance of that structure in the configuration file. LeviLamina will automatically read the configuration file contents into the structure instance.
This allows us to directly use the structure instance in C++ without manually parsing the configuration file.
First, create a new file named Config.h and define a structure Config to store configuration information.
| C++ | |
|---|---|
1 2 3 4 5 6 7 | |
Add a member variable in the anonymous namespace to store the configuration data.
| C++ | |
|---|---|
1 2 3 | |
Then, read the configuration file and store the configuration information in the member variable.
| C++ | |
|---|---|
1 2 3 4 5 6 7 8 9 10 11 12 13 14 15 16 17 18 19 20 | |
In this code, we first obtain the path to the mod's configuration file.
Then we call the ll::config::loadConfig() function to read the configuration information from the configuration file into the structure instance.
If reading fails, we output a warning message to the console and save the default configuration to the configuration file.
Note
Since configuration loading is performed inside the loading method, we can ensure that the configuration file has already been successfully loaded in later operations.
Persisting Player Join Information in a Database
The second feature of our mod is giving players a clock when they first join the server.
However, if we store join information only in memory, the information will be lost after the server restarts.
Therefore, we need to persist player join information in a database.
LeviLamina provides a wrapper for a KV database, allowing us to directly use databases in C++.
First, add a member variable in the anonymous namespace to store the database instance.
| C++ | |
|---|---|
1 2 3 4 5 | |
Note
Why use std::unique_ptr<ll::KeyValueDB> instead of ll::KeyValueDB?
This is because ll::KeyValueDB cannot be copied and can only be moved.
Therefore, we need to use std::unique_ptr to store an instance of ll::KeyValueDB.
Warning
Please do not use ordinary pointers to store the ll::KeyValueDB instance, because this can easily make lifetime management complicated and lead to memory leaks or other problems.
Remember: you are writing C++, not C.
Then, initialize the database instance in the load method.
| C++ | |
|---|---|
1 2 3 4 5 6 7 8 9 10 | |
In this code, we first obtain the path to the mod database.
Then we call std::make_unique<ll::data::KeyValueDB>() to create a database instance.
If the database path does not exist, std::make_unique<ll::data::KeyValueDB>() will automatically create it.
Note
Since database initialization is performed in the constructor, we can ensure that the database has already been initialized successfully in later operations.
Giving Players a Clock When They First Join the Game
The second feature of our mod is giving players a clock when they first join the server.
We need to determine whether a player is joining for the first time when they enter the server. If so, we give them a clock.
In Minecraft, when a player enters the game, the PlayerJoinEvent event is triggered.
In LeviLamina, we can subscribe to this event. When the event is triggered, the mod can implement the logic for players joining the server.
LeviLamina is smart enough to automatically remove event listeners when the mod is disabled, so we do not need to worry about the lifetime of event listeners.
| C++ | |
|---|---|
1 2 3 4 5 6 7 8 9 10 11 12 13 14 15 16 17 18 19 20 21 22 23 24 25 26 27 28 29 30 31 32 33 34 35 36 37 38 39 40 41 42 43 44 45 | |
Let's break down this code.
In the callback lambda function, we capture doGiveClockOnFirstJoin from the configuration, as well as the logger variable and the database instance.
Then we check whether doGiveClockOnFirstJoin is true. If it is, we continue executing the logic.
Next, we obtain the player instance and the player's UUID from the event instance.
Note
The UUID obtained here is of type mce::UUID, not std::string.
We recommend converting the UUID to std::string only when necessary, because the implementation of mce::UUID is more efficient.
Danger
Do not use XUID as the unique identifier for players.
Although many mods used XUID as the unique player identifier during the LiteLoaderBDS era, this is incorrect. XUID is an identifier for Xbox Live, not an identifier for players.
If the server does not enable online mode, or if fake players exist, the behavior of XUID will be unpredictable.
Therefore, we strongly recommend using UUID as the unique identifier for players.
Then, we use the player's UUID as the key to query whether the player has joined before from the database.
If the player has already joined, we do not need to give them another clock.
Next, we construct a clock item stack and add it to the player's inventory.
Note
Here we use the ItemStack class instead of the Item class.
The ItemStack class is a wrapper around the Item class. It contains information such as item count, enchantments, and durability, while the Item class only represents the item type.
Therefore, you should use the ItemStack class instead of the Item class.
Then, we need to refresh the player's inventory so that the player can see the clock.
Finally, we use the player's UUID as the key and mark the player as having already joined the server.
Displaying a Suicide Confirmation Prompt When Using the Clock
The third feature of our mod is displaying a suicide confirmation prompt when the player uses the clock. After confirmation, the player can commit suicide.
We need to subscribe to the player item usage event. When the player uses a clock, a suicide confirmation prompt will be displayed.
Register this event listener in the enable() function.
| C++ | |
|---|---|
1 2 3 4 5 6 7 8 9 10 11 12 13 14 15 16 17 18 19 20 21 22 23 24 25 26 27 28 29 30 31 32 33 34 35 36 37 38 39 40 41 42 43 44 45 46 47 48 49 50 51 52 53 54 55 56 57 58 59 60 61 | |
Let's break down this code.
In the callback lambda function, we capture the configuration option enableClockMenu and the logger.
Then we perform a check. The logic will only execute when this configuration option is enabled.
Inside the logic, we first obtain the two properties of the event:
- The player who used the item
- The item that was used
Then we check whether the item ID is clock, and if so, execute the form display logic.
Warning
Do not use itemStack.getName() because this function returns the display name of the item, such as Clock or Iron Sword.
Here we use the simplest modal form, ModalForm.
The constructor parameters are:
- The title of the form
- The message content displayed in the form
- The text of the upper-left button
- The text of the lower-right button
The callback function receives three parameters:
- The player to whom the form was sent
- The player's selection result
- The reason why the form was cancelled
The third parameter is not used in this example.
Running Your Mod
If your mod has been built successfully, you should see a directory named after your mod inside the bin/ directory.
Copy this directory to the plugins/ directory of the LeviLamina server or the mods directory of the LeviLamina client.
(Create the directory manually if it does not exist.)
Then run the LeviLamina server (bedrock_server_mod.exe) or the LeviLamina client.
Publishing Your Mod
-
Change the
versionfield intooth.jsonto the version you are about to release, for example0.1.0. -
Add the CHANGELOG for the upcoming release to
CHANGELOG.md.
For the specific CHANGELOG format, refer to keepachangelog.com.
Example:Markdown 1 2 3 4 5
## 0.1.0 - 2026-08-04 ### Added - First release. -
(Optional) Install Node.js, then run:
Bash 1npm install keep-a-changelog -g -
(Optional) Run:
to formatBash 1changelog --format markdownlintCHANGELOG.md. -
Create a new release on GitHub, for example
v0.1.0.
GitHub Actions will automatically write the contents of CHANGELOG.md into the release.
After waiting a few minutes, your mod will automatically be compiled and uploaded to the release.
Warning
You must use a version number that starts with v and follows Semantic Versioning.
Otherwise, your mod cannot be properly included by Bedrinth and LeviLauncher!